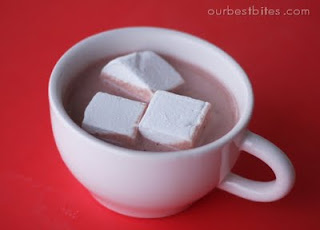

There is nothing more fulfilling than a homemade marshmallow and they are so simple to make. The following recipe was adapted from Alton Brown and can be found on our best bites website.
Homemade Marshmallows
adapted from Alton Brown, variations by Our Best Bites
adapted from Alton Brown, variations by Our Best Bites
3 packets unflavored gelatin
1 C ice water, divided
1 1/2 C sugar
1 C light corn syrup
1/4 teaspoon kosher salt
1 teaspoon vanilla extract
1/4 C corn starch
1/4 C powdered sugar
1 C ice water, divided
1 1/2 C sugar
1 C light corn syrup
1/4 teaspoon kosher salt
1 teaspoon vanilla extract
1/4 C corn starch
1/4 C powdered sugar
9 x 13″ pan
non stick spray
non stick spray
Optional for variations:
cocoa powder
peppermint extract
food coloring
dipping chocolate
crushed candy canes
cocoa powder
peppermint extract
food coloring
dipping chocolate
crushed candy canes
Place the contents of the gelatin packets into the bowl of a stand mixer. Add 1/2 C of the ice water. Stir gently to combine and then set that bowl aside.
In a small saucepan combine: remaining 1/2 C water, corn syrup, granulated sugar, and salt. Stir mixture to combine and bring it to a boil. Reduce to a simmer and then clip a candy thermometer onto the pan.
The sugar mixture needs to remain on a simmer and come to a temperature of 245 degrees F. It may take 20 minutes or so, so just stir the mixture every once and a while and keep an eye on the temp.
After the mixture reaches 245 degrees, remove from heat. Slowly pour the sugar mixture into the bowl with the gelatin. You may want to dirty one more dish and ladle the sugar mixture into something with a pour spout for easier/safer handling.
After you add the entire sugar mixture to the gelatin turn the beater speed up to med-high. Continue to whip for 12-15 minutes, adding the vanilla in the last few minutes of beating.
*Also, immediately put your sticky pan and utensils from the sugar mixture into very hot, soapy water. The quicker you get it soaking the quicker the goo will come off!
While your sugar goo is magically transforming into soft, fluffy marshmallows, prepare your pan. Combine the cornstarch and powdered sugar in a small bowl. Spray a 9 x 13″ pan with non stick spray and coat the bottom and sides with the cornstarch mixture. Tap excess out and save it.
When your marshmallows are done beating the mixture should be thick and white and luke warm.
Scrape the marshmallow mixture into the prepared pan. The stuff is sticky and gooey and it might put up a fight. Show it who’s boss. I found it helpful to spray my spatula with non-stick spray. Once the marshmallow mixture is all in the pan you’ll need to spread it out. A lot of recipes tell you to dip an angled knife into cold water first, but I found it much easier to spray the back of a large spoon with non-stick spray and spread it that way. It will be kind of lumpy, but just keep spraying and patting and get it as smooth as you can. (You can read my notes on variations later in the post to see why my marshmallows are two-toned)
Let the pan sit at room temp for about an hour (to form a dry layer on the top) and sprinkle a couple spoonfuls of the corn starch mixture over the top. Cover with a sheet of plastic wrap and let it sit overnight. Technically, you could cut the marshmallows after 4-5 hours, but I think they work better after sitting overnight.
When they’re ready to cut, just pull the marshmallowy sheet out of the pan. It should pop right out. The bottom side will be much nicer looking than the top side!
At this point you could use cookie cutters if you want some cute little shapes. I think hearts would be adorable for valentines day and stars are darling for Christmas time. If you do use cookie cutters, you can use a pair of kitchen shears to snip the scraps into mini marshmallows so you don’t waste any.
Otherwise, grab a pizza cutter, or a sharp knife if you don’t have a pizza cutter, and cut the marshmallow into cubes. It helps to dust your cutting implement with the cornstarch-sugar mixture. Especially after it gets sticky stuff on it.
Once they are cut, dust each marshmallow lightly with the remaining cornstarch mixture. This makes them easy to handle and keeps them from sticking together.
After cutting you’ll want to keep these in an air tight container or they will dry out just like store-bought ones do. They’ll be good for a couple of weeks if stored well.
variations:
– Add all flavorings and colorings in the last few minutes of beating.
For Cocoa Marshmallows: add in 3-4 tablespoons of unsweetened cocoa powder. If you make cocoa marshmallows, add a spoonful or two of cocoa powder to your cornstarch mixture as well.
For Peppermint Marshmallows: add in 1/2 teaspoon peppermint extract
For Colored Marshmallows: add food coloring in the last few minutes of beating (think colored fruit flavored marshmallows!)
P.S. Check back soon for my Mom's 50 year old family pumpkin bread recipe!For Cocoa Marshmallows: add in 3-4 tablespoons of unsweetened cocoa powder. If you make cocoa marshmallows, add a spoonful or two of cocoa powder to your cornstarch mixture as well.
For Peppermint Marshmallows: add in 1/2 teaspoon peppermint extract
For Colored Marshmallows: add food coloring in the last few minutes of beating (think colored fruit flavored marshmallows!)


No comments:
Post a Comment